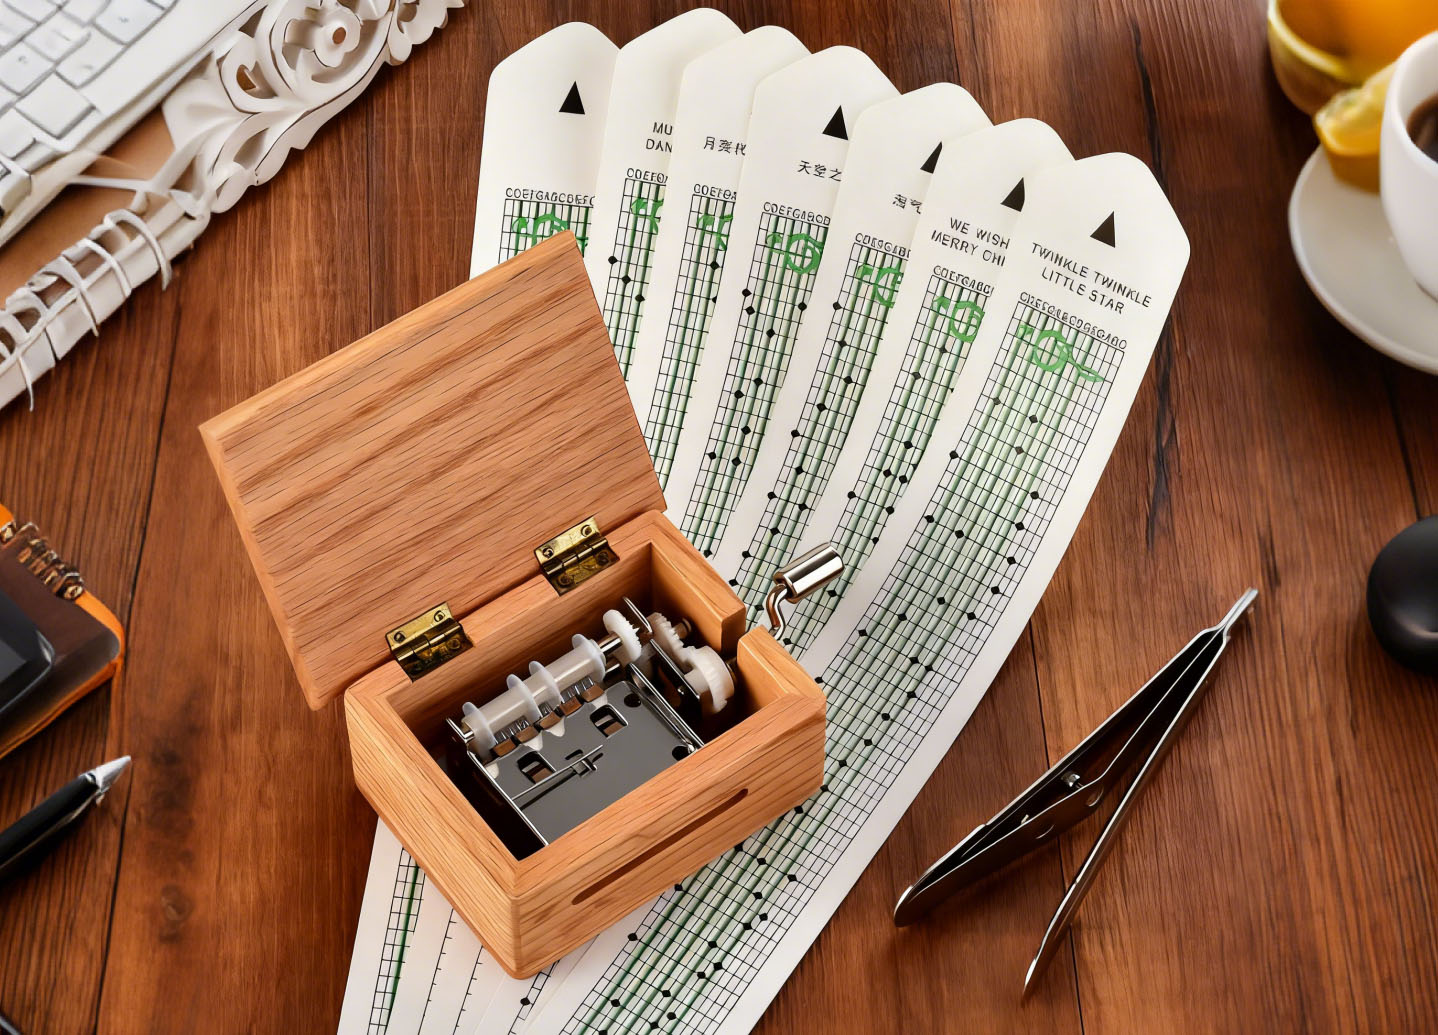
Crafting a paper music box offers a delightful escape from the daily grind. This creative process allows individuals to express their unique ideas and emotions. As they cut, fold, and assemble, they can find peace and relaxation. Plus, completing a custom paper music box brings a sense of accomplishment and boosts self-esteem!
Key Takeaways
- Gather essential materials like paper tape, a steel comb, and cardstock to ensure a smooth assembly process.
- Follow a step-by-step guide to prepare the base, create the music mechanism, and assemble the box for a successful crafting experience.
- Personalize your music box with decorative elements to reflect your unique style and enhance its emotional value.
Materials and Tools Needed
Creating a paper music box requires a few essential materials and tools. Gathering these items beforehand makes the assembly process smoother and more enjoyable.
Essential Materials
To build a delightful paper music box, you will need the following materials:
- Paper tape: This special tape programs the melodies that your music box will play. Choose colorful designs to add a fun touch!
- Steel comb: This component acts like a multi-pronged tuning fork. It produces sound through vibrations, bringing your music box to life.
- Cardstock or thick paper: Use this sturdy material for the box’s structure. It provides durability and a solid base for your creation.
- Adhesive: A strong glue or double-sided tape will help hold everything together securely.
- Decorative elements: Think stickers, markers, or even glitter! These items allow for personalization and creativity.
Tip: When selecting materials, consider the colors and textures that inspire you. Your music box should reflect your unique style!
Recommended Tools
Having the right tools on hand makes the assembly process easier and safer. Here are some recommended tools for your project:
- Scissors: A good pair of scissors is essential for cutting paper accurately.
- Craft knife: For more intricate cuts, a craft knife can be very helpful. Just remember to handle it with care!
- Cutting mat: This protects your work surface and keeps your cuts clean.
- Ruler: A ruler helps measure and draw straight lines, ensuring precision in your cuts.
- Pencil: Use a pencil for marking measurements before cutting. It allows for easy corrections.
Safety Reminder: When using cutting tools, keep these precautions in mind:
- Maintain focus on cutting operations to avoid distractions.
- Use machines with two-hand operation features to enhance safety.
- Follow the manufacturer’s instructions and safety precautions diligently.
- Always read the manual before operating cutting machines.
- Stop using the machine if you notice any unusual noises or issues.
By gathering these materials and tools, you set yourself up for a successful crafting experience. Now, let’s dive into the step-by-step assembly guide!
Step-by-Step Assembly Guide
Preparing the Base
To kick off the assembly, the first step involves preparing the base of the paper music box. This foundation will support all the components and ensure stability. Follow these steps to create a solid base:
- Design the Base of the Box: Start by determining the dimensions of your box. Make sure it can hold the music tapes and any figures you want to include.
- Use a Design Tool: Consider using a design tool to create an open box design with finger joints. This will help in achieving a snug fit.
- Create Necessary Holes: Make a hole in one corner for the hand crank. Also, create slots for the music tape to enter and exit smoothly.
- Check the Fit: Ensure the circular hole for the hand crank fits the width of the handle. This step is crucial for functionality.
- Test Measurements: Before cutting into your chosen material, test your measurements with foam core. This practice helps avoid mistakes.
- Assemble the Box: Use wood glue to secure the pieces together. Ensure you have five pieces and three holes for a sturdy structure.
- Finish the Edges: Sand the edges to remove any residue from the cutting process. A smooth finish enhances the overall look.
Tip: Using a strong adhesive, like a multipurpose glue, will help secure the base components effectively. Some popular options include clear glue sticks and craft adhesives.
Creating the Music Mechanism
Next, it’s time to create the music mechanism that will bring your paper music box to life. This part is essential for producing the enchanting melodies. Here are the key components you’ll need:
| Component | Description |
|---|---|
| Metal Structure | The framework that supports the entire mechanism. |
| Paper Strip | The medium that carries the musical notes, with holes that interact with the tines. |
| Gears | Transmit force from the crank to the rollers, enabling movement. |
| Rollers | Rotate to pull the paper strip and pass it over the tines. |
| Tines | Metal pieces that pluck to produce sound when the paper strip passes over them. |
To assemble the music mechanism, follow these steps:
- Attach the Metal Structure: Secure the metal structure to the base. This will hold everything in place.
- Insert the Paper Strip: Carefully thread the paper strip through the mechanism. Ensure it aligns with the tines for optimal sound production.
- Connect the Gears: Attach the gears to the crank. This connection allows the movement to transfer smoothly.
- Test the Mechanism: Before finalizing, give the crank a turn to ensure everything moves as it should. Adjust as necessary for better sound quality.
Note: The materials used in the music mechanism can significantly affect sound quality. Metal components often produce clearer sounds compared to polymer materials.
Assembling the Box
With the base and music mechanism ready, it’s time to assemble the box. This step brings all your hard work together. Here’s how to do it:
- Secure the Base: Start by attaching the base to the sides of the box. Use wood glue and clamp the pieces together until fully dried. This ensures a strong bond.
- Add the Lid: Once the sides are secure, attach the lid. Make sure it fits snugly to keep the mechanism protected.
- Check for Stability: Gently shake the box to ensure everything is secure. If any parts feel loose, reinforce them with additional adhesive.
Tip: Cutting out enough wheels during assembly can prevent the individual pieces from breaking easily. This technique enhances the box’s structural integrity.
Adding Decorative Elements
Finally, it’s time to unleash your creativity! Adding decorative elements personalizes your paper music box and makes it truly unique. Here are some popular materials to consider:
| Material Type | Example Products | Price Range |
|---|---|---|
| Beech | Small beech box, Medium beech box, Here Comes The Sun, Woodstock, Aretha | $30.12 – $57.49 |
| Lacquered Wood | Lacquered box, Medium lacquered box | $24.64 – $54.76 |
| Walnut | Antique walnut music box, Medium walnut music box, Angelina, Danae | $35.59 – $84.87 |
To decorate your music box, follow these steps:
- Choose Your Colors: Select colors and patterns that resonate with you. Bright colors can add a cheerful vibe, while pastels may create a calming effect.
- Apply Stickers and Markers: Use stickers, markers, or even glitter to embellish the exterior. Let your imagination run wild!
- Seal Your Design: Once you finish decorating, consider applying a clear sealant to protect your artwork. This step ensures your design lasts.
Reminder: Personalization is key! Your paper music box should reflect your style and personality.
Tips for Success
Common Challenges
Assembling a paper music box can be a delightful journey, but it may come with a few bumps along the way. Here are some common challenges that crafters often face:
- Gears Skipping Teeth: Sometimes, the gears may not mesh properly, causing them to skip. This issue can disrupt the music mechanism.
- Paper Strip Jamming: The paper strip might get stuck, preventing the music from playing smoothly.
- Disassembly Difficulties: If repairs are needed, disassembling the mechanism can prove tricky for many.
Troubleshooting Tips
When things don’t go as planned, don’t fret! Here are some handy troubleshooting tips to help you get back on track:
- Check Gear Alignment: Ensure all gears turn in sync. If one gear doesn’t move, gently reposition it with a toothpick or soft tool.
- Fix Misalignment: If the comb or cylinder seems off, nudge them into position with your fingertip. A straight comb is crucial for sound quality.
- Charge the Music Box: If the music box doesn’t play, charge it with a micro-USB cord. Sometimes, a quick charge is all it needs to spring back to life.
- Inspect the Toggle Switch: Look for a small black toggle inside the box. It might be in the off position, preventing sound.
- Work in Good Light: Ensure you operate the music box in a well-lit area. Poor lighting can affect its performance.
Tip: Break large projects into smaller chunks. This approach makes it easier to manage tasks and reduces stress. Stick to a schedule to keep your crafting on track!
With these tips in hand, crafters can navigate challenges and enjoy the rewarding experience of creating their own paper music box!
Assembling a paper music box involves several exciting steps. Crafters prepare the base, create the music mechanism, assemble the box, and add decorative elements. Each step brings joy and satisfaction.
Readers should share their finished projects and experiences. Personalization enhances emotional value, making each music box a cherished keepsake.
Here are some creative design ideas to inspire:
| Design Idea | Description |
|---|---|
| Nature Themes | Includes motifs like swans, butterflies, and flowers, often handcrafted with intricate details. |
| Light-Up Features | Incorporates LED lights to enhance visual appeal, creating a multisensory experience. |
| DIY Options | Blank canvases for personal artistic expression, suitable for all ages. |
| Travel Memories | Features landmarks and symbols from popular destinations, evoking memories of adventures. |
| Jewelry Storage | Combines functionality with music, offering compartments for jewelry with a melodic surprise. |
Let creativity flow and enjoy the crafting journey!
FAQ
What is a paper music box?
A paper music box is a handcrafted musical device made from paper and simple mechanisms. It plays melodies when cranked, creating a delightful sound.
How long does it take to assemble one?
Assembling a paper music box typically takes about 2 to 4 hours, depending on the complexity of the design and the crafter’s experience.
Can I customize the music?
Absolutely! Crafters can choose different paper tapes to program various melodies, allowing for a personalized musical experience.
Post time: Sep-26-2025

